Quick Answer: Can You Install LED Headlight Bulbs Yourself?
Yes, most LED headlight bulbs can be installed at home without professional tools. In many vehicles, replacing halogen bulbs with LED headlights is a simple plug-and-play process that takes 15–30 minutes, depending on headlight access and bulb type.
Table of contents
Feeling overwhelmed by extra modification costs at your local shop just to upgrade your headlights? Not sure how to install LED headlight bulbs yourself? Don’t worry—Lasfit has you covered with this detailed guide that walks you through different installation methods based on your vehicle setup.
Replacing halogen bulbs with LED headlight bulbs is easier than you think, and in many vehicles, LED headlight installation can be completed at home with no professional tools required.
5 Quick Steps to Replace Your Headlight Bulbs
Step 1: Access the Headlight Housing
To install LED headlight bulbs, you must first access the headlight housing. Depending on your vehicle design, this can usually be done through the engine bay, wheel well, or front bumper.
- Method 1: Through the Engine Bay – Open the hood and reach into the headlight housing from the engine compartment.

- Method 2: Through the Wheel Fender – Turn the front wheels to one side and access the housing by removing or loosening the fender cover near the wheel well.

- Method 3: Remove the Front Bumper – In some cases, you may need to partially or fully remove the front bumper to reach the headlight housing.

Step 2: Remove the Dust Cover
- If your housing has a dust cover: Twist it counterclockwise and remove it.

- If there’s no dust cover: You can skip this step.
Step 3: Disconnect the Halogen Bulb
- Unplug the power connector from the stock halogen bulb.

Step 4: Remove the Halogen Bulb and Install the LED Bulb
The installation method may vary depending on your bulb type. Here’s how to handle the most common types:
How to Install H11 / 9005 / 9006 / H10 / H13 / 9012LED Headlight Bulbs
H11, 9005, 9006, H10, H13, and 9012 LED headlight bulbs use a twist-lock design, making installation quick and beginner-friendly.
- Twist to remove the halogen bulb.
- Insert the LED bulb and twist it in the opposite direction to lock it in place.
How to Install 9004 / 9007 LED Headlight Bulbs
- Remove the halogen bulb and detach the locking ring.
- Remove the collar from the LED bulb.
- Install the locking ring onto the LED bulb, then reattach the collar.
- Insert the LED bulb into the housing and twist to secure.

How to Install H4 / H1 / H3 LED Headlight Bulbs (Spring Clip Style)
- Release the spring clip and remove the halogen bulb.
- Detach the LED bulb’s metal base and fix it under the spring clip.
- Insert the LED bulb into the fixed base.

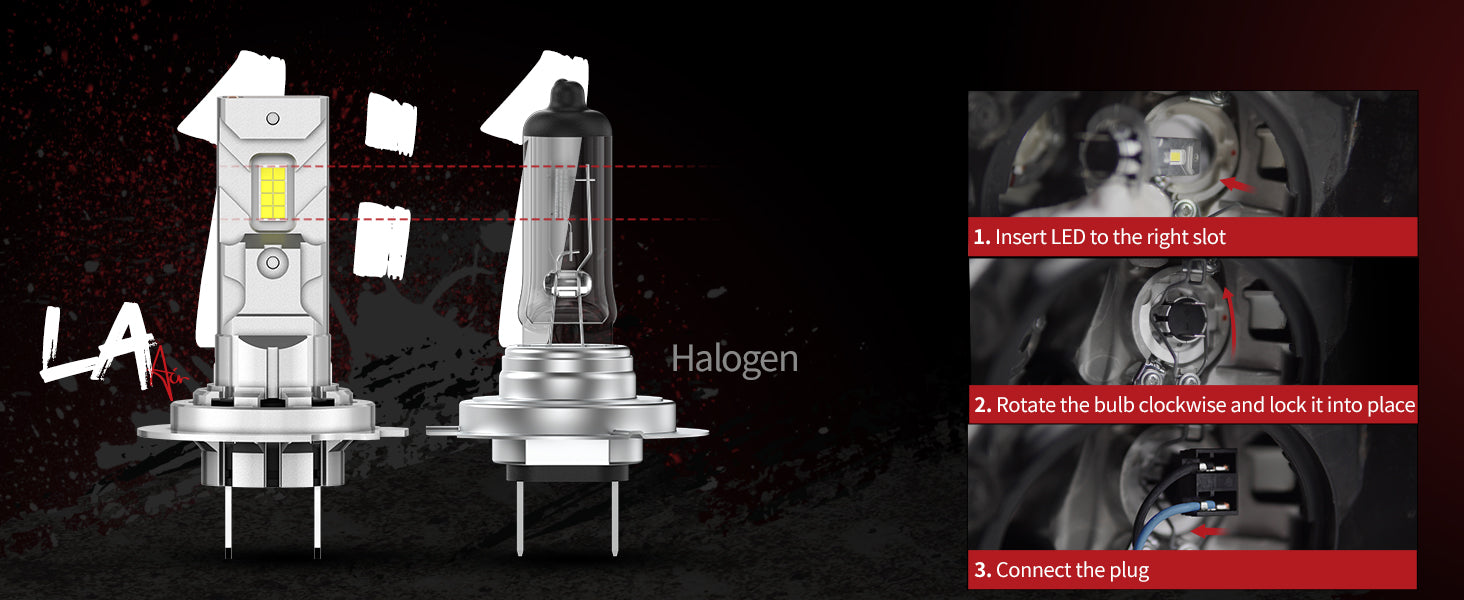
For Lasfit Air Series H4:
The Lasfit LA Air Series is our all-in-one design lineup with no additional cables required. Both the H4 and H7 bulbs are designed to closely resemble halogen bulbs, giving you a hassle-free installation experience just like replacing a stock halogen light.
- Open the clip, remove the halogen bulb.
- Directly insert the Air Series bulb and reclip.
H7
There are several types of headlight assemblies for H7 bulbs, and in this guide, we’re covering the most common one—with a spring clip.
- Release the spring clip and remove the halogen bulb.
- Detach the LED bulb’s metal base and secure it under the clip.
- Insert the LED bulb into the fixed base.
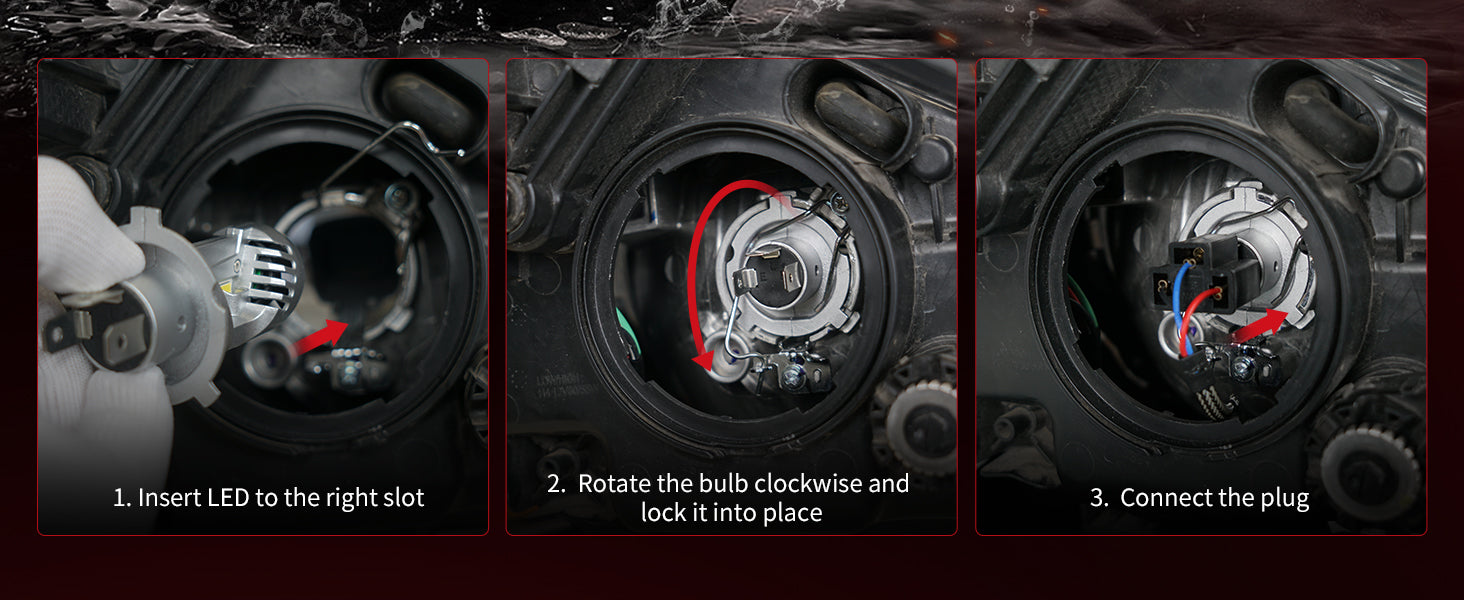
For German/Korean Vehicles Using H7 Bulbs with Unique Adapter:
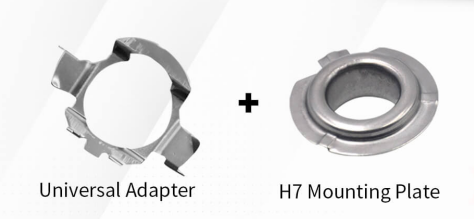
- You may need to purchase an additional adapter.
- Detach the halogen bulb and its metal base.
- Combine the LED base with the special adapter, secure it, and insert the LED bulb.
For German/Korean Vehicles Using Lasfit Pro Series H7:
Upgrading your headlight bulbs on a German or Korean vehicle can be tricky, especially when most aftermarket H7 LED bulbs require an additional adapter. That’s why Lasfit offers custom-fit H7 LED bulbs designed specifically for select German and Korean models. With these vehicle-specific LED bulbs, you can enjoy a seamless plug-and-play installation—no extra adapter needed. Save time, skip the guesswork, and get a perfect fit every time with Lasfit.
- Twist to remove the halogen bulb.
- Insert the LED bulb and twist in the opposite direction to secure it.

For Lasfit Air Series H7:
- Remove the halogen bulb and directly install the Air Series LED bulb.
- Reclip to secure.
Step 5: Connect Power and Test the Light Output
- If the beam pattern looks good: Reinstall the dust cover (if applicable) and secure the engine bay, fender, or bumper as needed.
- If the beam pattern is misaligned:Adjust the LED bulb’s position.
- Can’t adjust? Some LED bulbs may not support rotation.

- Using Lasfit LED Bulbs with Adjustable Socket? Some of Lasfit LED bulbs come with a 360° adjustable collar, allowing you to fine-tune the beam pattern.
Additional Installation Tips for LED Headlight Bulbs
1.Wear Gloves During Installation: To protect both your hands and the bulbs, it's recommended to wear gloves when replacing your headlight bulbs. This helps prevent oils or dirt from affecting performance.
2.Properly Adjust Dual Beam Headlights: If you're installing dual beam LED headlight bulbs, make sure the beam pattern is correctly aligned for both low and high beams. Not sure what dual beam means? Lasfit offers a clear explanation of the difference between single beam and dual beam LED bulbs, helping you choose and install the right type for your vehicle.
And that’s it! Now you know exactly how to install LED headlight bulbs and replace your old halogens with ease. Got any questions or specific installation tips for your vehicle? Drop a comment below—we’d love to help!
LED Headlight Installation FAQ
How long does it take to install LED headlight bulbs?
Most installations take 15–30 minutes, depending on vehicle design and bulb type.
Do LED headlight bulbs require additional wiring?
Most modern LED headlights are plug-and-play and do not require additional wiring or modifications.
Can LED headlights cause glare?
Glare usually occurs due to improper installation or incorrect bulb type. Choosing vehicle-specific LED bulbs and adjusting beam alignment can prevent glare.


2 comments
Trying to install la d1 kit. I can’t recall where to splice in
Good ligh